Google Analytics is an essential tool that you can use to track your business webpage’s performance and analytics, ultimately helping you to market your business and sell more of your product or service. You can to share access to this platform with other employees and outsourced marketing teams, so they can collaborate with you, to improve your sales and marketing performance.
There are varying levels of access and usership that you can grant to others. However it is important to bear in mind that you should take great care when granting access to your Google Analytics account, as the data it contains is vital to your business. This step-by-step guide will teach you how to grant access to others, and how to keep your business secure.
Owning your Google Analytics
Your Google Analytics page belongs to you, and you are responsible for keeping your data, customer information, and visitors secure.
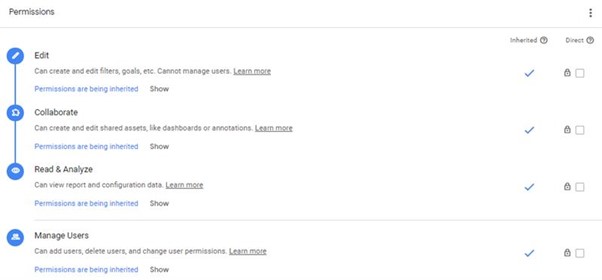
The highest level of access provides the ability to ‘Manage Users’. Those with Manage Users permissions have complete control over the Google Analytics account. They can alter anything within the account and its content, and they have the power to grant access to, or delete other users. You should ensure that you always have the ability to Manage Users access, and that you only give this access level to users that you trust.
You can check that you have Manage User permissions by following these steps:
- Click on the gear button in the lower left corner of the GMB Dashboard. This will take you onto the Admin page.
- On the left is the Accounts column. Select the ‘User Management’ option.
- Select your username.
- Ensure that there is a blue tick in the ‘Manage Users’ box beside your username.

If you have accounts on other Google platforms such as Google Search Console, Google My Business, or Google Tag Manager, we recommend that you also use this one, single login for those accounts. Having one account will make it easier to navigate to other tools within the Google Marketing Platform and will prevent any hassle or confusion when switching between them.
Accounts, Properties and Views Explained
Google Analytics divides all of its accounts at three levels: Accounts, Properties, and Views.
When you set up an account, you can have up to 50 Properties. Within each Property, you can have up to 25 Views. A Property is typically an individual website or app. You will need one of these for each brand or public facing company that you are managing in your organisation. If a brand has both an app, and a website, you will need one for each, or a single GA4 entity (see below) if the data source is the same.
Views are properly known as ‘Reporting Views’ and segment the data, allowing you to apply different filters, for example Raw Data, and a view which applies filters for spam traffic, for example. You can also have GA4 View and a standard, Universal Analytics View (see below) of the same website.
This is all relevant in the sense that you may provide a marketing agency or developer access to any specific level: a View, a Property, or indeed, the whole Account.
The levels of Google Analytics access
Google Analytics accounts are split into 3 sections. In the Admin section, there are three columns: Account, Property, and View. These settings are a hierarchy that represent the levels of user access that you can grant in Google Analytics.
The Accounts
The Accounts level of access grants the user ultimate control over the entire analytics account. These users can alter any of the enabled features, and they can add or delete users and websites from the account. This level of access should only be granted to owners of the account, and marketing employees that need to make larger alterations to your account.
The Properties
The Property level of access is the one that you will likely grant to your marketing teams. This will allow these users access to most of the features of Google Analytics. They will be able to create tasks and posts, and they will be able to set up, track, and review analytics features.
The Views
This is the lowest level of user access. View level users will only be able to view data; they will not be able to make any changes to the data stored in your analytics, and they will not have the power to grant access to or remove other users. This user type is suitable for team members or clients that will need to simply review and assess website performance data.
The different types of permissions
Once you have decided which level of access to grant each user, you can then further customise what controls these users will be able to access using the ‘User Management’ function.
There are four kinds of permissions that users can be granted:
- Manage Users: This is the highest level of permission and should only be accessible to the business owners. This grants the user total control over the accounts, and they can add or delete users. They can even delete others that can Manage Users, so it’s important to only grant this access level to people you can trust.
- Edit: The edit permission grants the user the ability to create and alter filters, funnels, and goals, and change the settings. This permission level also means that the user can create properties and views. This level of permission is usually given to users you can trust, such as members of your marketing team.
- Collaborate: This permission allows users to create, edit, and share dashboards, annotations, and reports. This level of permission is suitable for team members that need to be able to access data, but who are not responsible for making big decisions regarding the account.
- Read & Analyse: This permission level is the lowest trust level on analytics. This feature allows users to view data and reports, but they are unable to generate any content or make any changes to their findings.
GA 4 vs Universal Analytics
GA4 is the most recent version of Analytics, released by Google. It allows app and website data to be viewed in one, single property. Since most existing Google Analytics accounts are in the existing Universal Analytics format, you can now have a separate GA4 View of the same Property, and the existing View will be unaffected. So you can have 2 Views of the same website – one in the new format, and another the old format (or as many as you like, up to 25, of course).
We typically use Universal Analytics for our internal reporting purposes, and we prefer clients to provide us with Universal Analytics access for the foreseeable future. Providing us with access to the whole Account or Property will allow us to access the UA view, or create one if it does not already exist.
How to grant access to Google Analytics
Once you have decided the level of access and permissions you are going to grant to a new user, you can set them up using the following instructions:
- Log into Google Analytics
- In the bottom left-hand corner, there is a gear icon. Click on it to access the Admin section
- Select the Account column, and click User Management
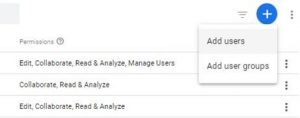
- In the top right corner, there is a blue plus button. Selecting this will allow you to add a new user. Click it and then select Add Users
- Enter the email address of the user you would like to grant access to
- Here, you can choose what user type you are going to create. Tick the checkbox besides the correct type, for example Manage Users, in the bottom right corner
- Click on the Add button in the top right
- You have now successfully added a new user. There is an option to notify any new users by email, and if you select this, they will now receive an email to let them know they have access.

Be picky
You should regularly reassess the users and their permissions within your account. This will ensure that there is nobody who can access your account who doesn’t need to be there. If you remove somebody who does still need access, it’s simple to re-add them to the account. Clean up your list of users to keep your business and Google Analytics account secure.


